Friday, December 20, 2013

Ornament

Chickadee Ornament, 2013
Wool applique, 6" x 2 1/4"

This ornament pattern is one of many that I found at Downeast Thunder Farm in Susan's Bird Patterns . The patterns (from wrens to owls to a Canada goose!!) are downloadable in PDF format.  Each pattern has a photo of her finished bird.  She'll share the patterns, but they are for "your personal, not-for-profit use." You cannot redistribute the patterns without written permission of the artist or sell them, and she encourages you to make the birds for non-profit fundraising. Great idea....
I made the pattern double sided, added a ribbon for hanging, and gently stuffed the chickadee with polyester. 

Monday, December 16, 2013

The End of Humble Beginnings

Humble Beginnings, 2013
Pattern by Jane McGown Flynn.
#4 Hand dyed wool strips on burlap, 19" x 35"

The rug is finished except for whipping the edge.  I almost completed the rug with Peggy Hannum's color plan......almost.  I had dyed enough wool to complete the rug as she had planned, but I added some of the deep red to the border rather than complete it in brown.  I believe the center design may have been more the focal point, if I had completed the edge in browns as she suggested, but I just wanted to hook in another color. (I still wonder what the rug would look like with a background of royal purples???) I have a good spot on our floor for this rug.

More Coasters

Coasters, 2013
Wool strips on linen, 4.5" x 4.5"

These coasters were hooked by Sara and I received these as my exchange gift at our ATHA Christmas gathering.  I love the bright colors.
Sara also included her beautiful card that she printed using a linoleum cut that she created.

Saturday, December 14, 2013

Coasters

Coasters, 2013
Wool appliqué, each 4" x 4"

Our Atha chapter chose a challenge for us - make a set of 4 coasters for a gift exchange at our Christmas get together. The pattern I used is an adaptation of a penny rug pattern I purchased from Oley Valley Primitives called Bluebird on a Branch. The coasters have an insulating layer of a material from Worcester Industrial Rubber Company that is a mixture of cork and rubber bits.  It's flexible and thin enough for my needle to pass through. 

Tuesday, December 10, 2013

Onion Skin Dyeing......again

This is the second method of dyeing with onion skins that I've tried.  The first time (post 6/28/13) was using alum as a mordant, making a dye bath with the skins before dyeing, and moving the wool frequently during the dyeing process.  This time I used no mordant.  I layered the wool (soaked in Dawn and water) with dried onion skins in my dye pot.  Each piece of wool had crumpled skins under it and above it.  I layered 6 pieces of Dorr's natural wool and added enough water to just cover the wool.  I let the wool simmer on the burner for 1 hour, occasionally pushing the fabric down into the water.  The pieces were then separated from the onion skins and tossed into my front loading washer for a rinse.   The color result is very different from the wool using the alum mordant.  This wool almost has a "leather" appearance to it. I have a rug with a lion pattern........ this might be perfect....

Wednesday, December 4, 2013

Winter Barn


Winter Barn, December 2013
Acrylic on Canvas, 6" x 4"

Saturday, November 23, 2013

Humble Beginnings Update

Rug Border

The color plan calls for the darker version of Dot Ebi's formula (earlier entry) to be used in the border. Here is how it looks when hooked.  Now..... just need to finish hooking this border....

Friday, November 22, 2013

Something Different

Bracelet, 2013

Here's a bracelet made from some simple materials found at home and the local craft store. The 6 large beads are made of Sculpey, Fimo, and beads from a inexpensive package off the shelf.  The small spacer beads are from the same package. The polymer clay is baked in the oven at 275 degrees (instructions are on the package).  The beads are strung with elastic. The possibilities are endless.

Sunday, November 10, 2013

Humble Beginnings


Lighter Brown Background
Following Dot Ebi's formula listed in the previous blog, I dyed (using Cushing Dyes) this spot on rust colored wool that I purchased from Dorr Mill.  The formula used salt, which I had not done before.  I was pleased with the result, but I'll probably go back to my white vinegar mordant.
 Here is how the background looks once it's hooked. This is an exercise for me.  I am following a color plan for this rug by teacher Peggy Hannum that appeared in the McGown Newsletter of May 2001.  Peggy completed this mat in 2000.  As I posted before, I've never begun a rug with a color selection completely planned by another artist. I like these results, but I can't help wondering... what would this have looked like with a deep royal purple background?.... would the yellow of the flowers with the complementary purple color be more striking?... would the yellow-green in the leaves and stems pop?

Thursday, October 10, 2013

Progress

Progress on Humble Beginnings

The central design is done.  Now to dye and hook the background.  The color plan calls for light and dark spot dyes over rust colored wool.  The formula is Dot Ebi's spot #44 (Scraps or Spots): 1/8 t Kahaki Drab, 1/8t Bronze Green, 1/8 t Old Gold, and 1/16 t Mahogany.  After the spot dye is finished, the color plan says to over dye the wool with Mahogany.  The  formula is the same for the darker background color, but the amounts are doubled.

Tuesday, September 24, 2013

Spot Dye

Wool for the Stems in the Rug "Humble Beginnings"

The rug color plan calls for a spot dye (Cushing dyes) for the stems of the flowers.  Peggy Hannum's dyeing directions call for 1/8 t Bronze Green, 1/8 t Old Gold, 1/8 t Bronze, and 1/16 t Mahogany to be used in Dotti Ebi's Spot Method.  Each color is dissolved in a cup of hot water and 2 T of white vinegar.  Dotti Ebi's book is the paperback Scraps or Spots, 115 Formulas for Rug Hooking, 1979.  I used 1/2 yard of butterscotch colored wool soaked in warm water and Dawn dishwashing detergent. I placed wrinkled aluminum foil in the bottom of my dye pan and added the wool on top.  The wool was crumpled, not folded.  The dyes were applied by the tablespoon (T) in a designated pattern.
                                                             OXOXOX
                                                             XOXOXO
                                                             OXOXOX
                                                             XOXOXO
                                                             OXOXOX
                                                            ( p.24, Scraps or Spots)
The "O" was Bronze Green and the "X" was Old Gold.  The Bronze was applied wherever space was available and the Mahogany was used as an accent.  After the dyes were applied, I salted the material per directions (just used my regular salt shaker).  I added 5 cups of boiling water on the edges of the pan (not directly on the wool), and then the wool was pushed under the water to somewhat mute the colors.  I covered the pan with aluminum foil and baked it in a 275 degree oven for 1 hour.  I rinsed the wool in my machine (remember, I have a front loader so I'm not worried about felting the wool) and popped it in the dryer.  The photo at the top shows the result.
Now to hook the stems.

Saturday, September 21, 2013

Progress


The red wool is hooked in the daisy like flowers in the Humble Beginnings rug.  I could not find Maryanne Lincoln's Country Color Formulas booklet, so I dyed a soft yellow to use instead of the recommended color for the small flowers and the daisy centers (so much for the plan......).

Friday, September 13, 2013

The Challenge

 Jacobean Challenge, 2013
Wool strips on backing

Ellen completed her ATHA June challenge.  She chose to make the Jacobean design into the hooked top of a footstool. Great idea! She also added her own elements to the design (the upper bell flowers and the swirl to the left). I really like the movement in her background.

Wednesday, September 11, 2013

A Color Plan


Humble Beginnings

This pattern is 19" x 35" and was created by Jane McGown Flynn.  I came across a color plan for this rug by Peggy Hannum in the McGown Newsletter of May 2001.  Peggy completed this mat in 2000.  I've never begun a rug with a formal color plan, and certainly not one completely planned by another artist.  I usually start a project with a few colors that I like and believe will work in the design.  I color plan as I go along.  So this is a new challenge for me.  This color plan calls for dyeing 6 and 8 value swatches and spot-dyes. 
The first step was to find the formulas Peggy listed in her article.  Some books I found on Ebay and some on Amazon.  Two of the recipes came from Jane Elliot's Color Flow books. I could not find these as they were out of print.  I contacted the Dorr Mill Store, and they were very helpful. I was able to buy copies. (Great store with such an accommodating staff!)
The two daisy like flowers are hooked in 8 swatches of red (Color Flow #92).  The Cushing dyes used in the formula are Rust (1/32t), American Beauty (1/16t), and Egyptian Red (1/8t).  The 8 swatches are 12" x 14", so the recipe was tripled. I used white vinegar as the mordant which I added after the wool had begun to absorb the dye. The wool is white from Dorr Mill.
The wool pieces were soaked in water with a little Dawn detergent.  I then dyed each piece in it's own pot, so that I could keep the wool moving in the water and get very even color.  (Time consuming though, as I have only 3 dye pots) Each swatch simmered in the pot for an hour.
Now.... let's see if I can keep to the plan......


Challenge Trees


ATHA Challenge, 2013
Wool strips on backing, 10" x 10"

This mat is one of the four patterns I drew for our local Atha group as an end of year challenge.  Mary sent the picture when she finished hooking the piece.  I love her color choice and the changes she made to make the pattern her own. 

Tuesday, September 3, 2013

Pears

Pears, 2013
Acrylic on mat board, 1.5" x 1.5"

I've been interested in making smaller and smaller pieces.  I've done some artist trading cards (2 1/2" x 3 1/2") in mixed media and in fiber.  The fiber pieces were posted on 5/1/12 as "Hooked Miniatures".  This piece is smaller yet.  My goal is to make some pieces that are 1" x 1". They are called inchies. This started with getting the book Inchies  by Peggy Donda-Kobert. When I started researching inchies, I was amazed by how many people are interested in this mini-art.

Tuesday, August 20, 2013

Sketch Book Page


Lion, 2013
Graphite on Strathmore, 7.5" x 8.5"

This is from my sketch book.  It is one of the lions in National Geographic's The Serengeti Lions project which I found very interesting.  The photo used as reference is by Michael Nichols.   

Monday, July 22, 2013

Internet Rug Camp

After reading Gene Shepherd's Prepared to Dye, I was very interested in what lessons he provides.  Being on opposite coasts, I signed up for his Internet Rug Camp. He offers on line video lessons, a blog, and a few free patterns for $36 a year.  I've enjoyed watching the videos especially, some with the dyeing techniques from his book.

Thursday, July 18, 2013

Hooking in White

I recently came across an interesting question, "How do I hook a white animal?", and I started thinking about how to hook (or paint) anything white…. white flowers, white animals, snow… 
I think the best advice is from Claude Monet.  He once gave some advice to another painter saying, "When you go out to paint, try to forget what objects you have before you — a tree, a house, a field. . . . Merely think, here is a little square of blue, here an oblong of pink, here a streak of yellow, and paint it just as it looks to you, the exact color and shape."

When we think of water - it's blue, trees are green, and polar bears are white.  We need to forget what we know about objects and really look at their color and shape. 
When we truly look at polar bears, snow, or white flowers we see many colors.  In nature white reflects colors of the sky and even objects that are close.

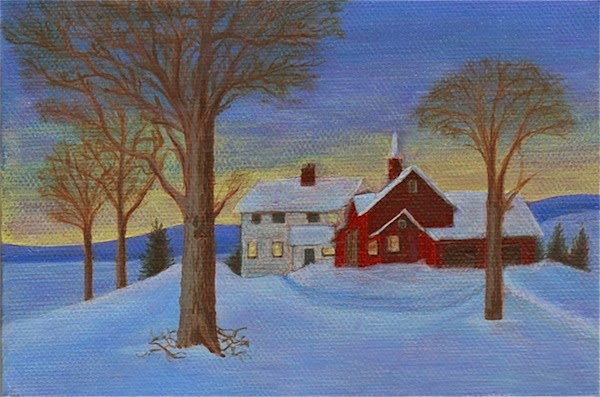
I used natural, blue, and lavender wools in the snow in "December Snow". Some of the snow wools were spot dyed with blue and lavender.


Elizabeth Black wrote directions for hooking a white animal in her book Hooked on the Wild Side.  She suggests using undyed white wool as the highlight, undyed natural wool as the next value, and the third value is a tan or pale gray for the shadow.  I do not have the expertise of Elizabeth Black, but I might also consider a very, very pale blue or violet for shadows. I suppose it depends on the colors of your rug and whether you want a warm shadow or a cool shadow.  I have some blue wools that are so pale they almost look white - until I hold the two side-by-side and then the blue color is obvious.

In the article "Not Quite White" in Rug Hooking Magazine, Karen Larsen hooked two white snowy owls. She says that she used off white as her highlight.  She had a gray windowpane plaid that was too dark, but she stewed that wool with her off white and the plaid released just a little color to dye the off white.  She also used an herbal tea (lemon verbena, lemongrass, and peppermint) to dye more off white wool.  She made the tea using 2 bags and added the colored water to her dye pan. She didn't allow the wool to stay in the pan more than 10 minutes and this produced a warm white. She began with off white and textured off white wools before her dyeing experiments.

Jane Halliwell Greene in 
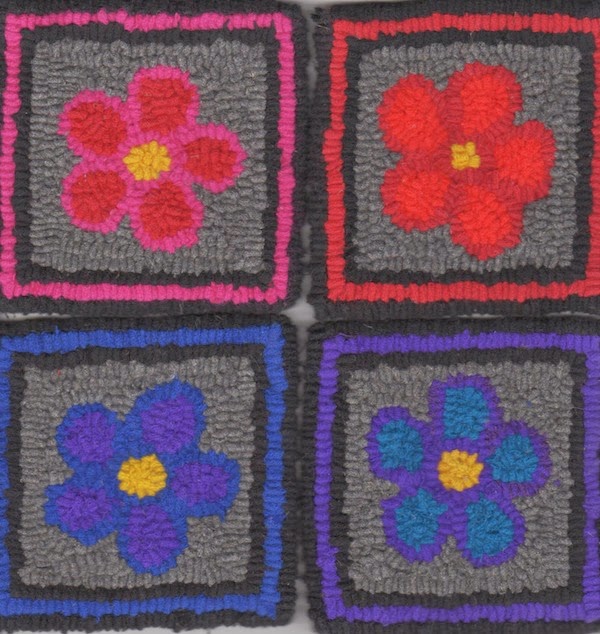
Rugs in Bloom, considers white flowers one of the most difficult to hook.  She writes that only about 25% of the flower is white, the rest is color. She explains that where the sun shines on a flower is the highlight - where the white would be used.  She suggests that this highlight might even be enhanced by hooking in a little yellow.  Jane writes that a white flower is defined by its shadows and the background around it.  She recommends pastel colors in the shadows - pale pinks, blues, and lavenders.  She suggests that when you've finished hooking the flower, take a photo.  Looking at the photo will help you to see if the colors are working to define the flower.  I was thinking that if the photo can be downloaded to your computer and changed to a black and white photo, you could really see the values….


Hooked on the Wild Side, Elizabeth Black, p. 11
Nov/Dec 2012 Rug Hooking Magazine, "Not Quite White", Karen Larsen, p. 38-40.
Rugs in Bloom, Shading Flowers in Hooked Rugs, Jane Halliwell Green, p.14-16.

Wednesday, July 10, 2013

Gene Shepherd


Prepared to Dye

I just received Gene Shepherd's new book in the mail.  It's 144 pages with beautiful photos, clear explanations, and great dyeing techniques for any fiber artist.  It's really warm today, but this book is exciting, and it's encouraging me to go start the pot boiling.... I'll let you know what comes of my experiments.

Saturday, July 6, 2013

December Snows


December Snows, 2013
Wool strips on linen, #3 and #4 cut, 2' x 3'

The hooking is finally completed on this rug, now to finish the edge.  It's called December Snows and was designed by Joan Moshimer.  (Kind of wish I could step into the scene for a moment.  It's supposed to reach almost 90 degrees here. That's warm for us.) The rug was done in narrow strips, which you can see more easily in the tree's bark.  You can read more about this rug on a previous blog entry, Project Progress, 4/3/13.


Friday, June 28, 2013

Dyeing with Onion Skins

Onion Skin Dye
I've been saving (so has my family) the skins of yellow onions to use for dyeing wool fabric.  The first step was to place the skins in a pot, cover with water, and simmer the skins for 1 hour.  The "soup" sat unheated for about 5 hours, only because I ran off to do other things. 
At the same time, I soaked the wool (12.8 ounces) in water with a little Dawn dishwasher soap and alum (the mordant).  I used 6 teaspoons of alum (this is what I had in the cupboard). The recipes I've read for dyeing with onion skins are varied. Some say you do not need a mordant, some use alum (amounts vary), some recipes say to use alum and cream of tartar, some use an aluminum pot to dye in and no mordant, some recommend white vinegar as your mordant, and some recipes say to use uniodized salt. So, my theory is, if you want to try it now, use what you've got and keep good records.
When I returned to the experiment, I drained the skins from the water with a colander and placed the liquid (now the color of very dark tea) in my dye pot.  I added the mordanted wool (1/2 Dorr white and 1/2 Dorr natural), heated the mix, and simmered the wool for 30 minutes.  I frequently moved the wool about to be sure the color would be more even. I left the wool to cool for 1 1/2 hours and rinsed it by hand.  It was then placed in the washer to rinse and spin, and then into the drier.  I have a front load washer, so I'm not too worried about felting the wool. Here's the result:
The natural wool is at the top, and the white wool is on the bottom of the photo. 
The colors (hard to make accurate in the uploaded photo)  are between orange-yellow and golden yellow on the Ives color scale.
Now....to save skins again and try a different formula!


Tuesday, June 25, 2013

Ice Dyeing

Ice in Dye Pot

I was reading about using ice when dyeing on several sites on the Internet, and I wanted to try it.  I soaked my wool in a little Dawn and some white vinegar (this soaked overnight - only because I couldn't get back to the project).  I didn't have a rack to use in my pan (as recommended on some sites), so I used Heavy Duty Reynold's Aluminum Foil, scrunching it up to raise the wool off the bottom. I placed the wool in the pan (1/2 yard, randomly crumpled), covered it generously with ice cubes, and added the dry dye. As you can see in the above photo, I liberally sprinkled dye (ProChem Key Lime, Grape Juice, Purple, and Seabreeze) on the top of the ice.  I let the ice melt which took most of the day.  I then covered the pan with aluminum foil and placed it in the oven for 30 minutes at 300 degrees. After the oven, I rinsed the wool by hand, placed it in the washer for a good rinse, and tossed it in the dryer. And here's the result:
The wool design reminds me of a garden.  It might be a good background for some flowers?  or maybe a flowered field?  The results were a surprise as I had no idea when I started what I'd get.  I'll try this again. I'd like to get or make a rack to hold the wool up higher in the pan, and I'll try some different color combinations. 

Friday, June 21, 2013

Rose Progress

The One Rose
Here's progress to date on my first rose.  I decided to hook it in Maryanne Lincoln's Basic Red, cut in a #3.  I've dyed the green for the leaves, but I haven't decided on a background as yet. The beautiful weather and the outdoors seem to be encroaching on my time to hook.

Thursday, June 20, 2013

Color Conundrum ...again


Color Tool 3-in-1
by Joen Wolfrom

Reading Ms. Wolfrom's books inspired me to purchase her Color Tool.  There are 24 color cards based on the Ives color wheel, each showing the pure color, tints, shades, and tones (on the front of the card and expanded on the back).  The front of each card shows the monochromatic, complementary, analogous, split-complementary, and triadic color plans. The cards include simple directions on the use of the tool and a picture of the Ives color wheel. The last two cards are a red and a green value finder. 


Joen Wolfrom stresses the importance of value contrast to design, even a monochromatic one (using the tints, shades and tones of one hue). You can see the values when I place the red value finder over this hooked piece.

In the hooked leaves I've used a red-violet vein that disappears under the red card.  The colors are different but the values of the green and red violet are the same.  The colors disappear under the red card, only the values are seen.  It is easy to see the contrasting value of the leaves against the background. 

Using this tool, I ordered some new dye colors today for future experiment using a split-complementary color plan with (what else?) chartreuse.


Tuesday, June 18, 2013

Beach Ladies


Beach Ladies
This is the fourth and final design in the ATHA year end challenge. This pattern was the most playful.  Carol and Deb transformed their hooked mat into pillows.  Carol (top pillow) added ribbon  bows to the sun hats.

Jane's hooked mat is at the top.  Peggy's choice was to use the design on a coaster.

Teomi used raffia to hook the ladies' hats on her mat (top). Raffia is a perfect fiber to use for a straw hat. She has just a bit to finish.  Judy D. is trying out a variety of fibers that she will use to complete her mat. In addition to raffia on the hats, she's using stockings to hook their tanned skin, terry cloth strips to hook the blanket, fabric strips for the suits, and plastic bag strips for the sea.  
The year end challenge was a way to highlight the creativity of members of our group, and everyone's piece reflects their individuality.  I always learn something from the work of others. I appreciate all those who chose to participate. I'm looking forward to taking part in more group challenges. 

Monday, June 17, 2013

Color Conundrum 2

Color Play by Joen Wolfrom

Here's more on color characteristics.  This book, Color Play, is also written for quilters, but the message can be used with any fiber.
Joen Wolfrom explains pure color, tints (color with white), shades (color with black), and tones (color with gray). She defines intensity, value, color temperature, and monochromatic color schemes. 
When she begins explaining complimentary color schemes, there is a twist.  I learned that the primary colors are red, yellow, and blue.  The complimentary colors are opposites on the color wheel - red and green, blue and orange, and yellow and purple. Other color relationships are based on where these colors are placed on the wheel. This is the artist's pigment wheel.

However, Joen Wolfrom uses the Ives color wheel in her book. This color wheel is used in dyeing fabric, printing, and photography.


In the Ives wheel, the primary colors are magenta, yellow, and turquoise. The complimentary color pairs are red and aqua green,  blue and orange-yellow, and yellow and violet. ( I must admit, I like the red-aqua green complimentary pair better than the red-green combination). She understands that many quilters have not had any formal color training, so she suggests that they start with colors that interest them and experiment from there. Maybe I'll be trying some chartreuse-red-violet designs!

She shows many design examples and sample quilts. An entire chapter is devoted to each color family (yellow, green, blue, violet, red, and orange) and the color schemes for that family. (She has 3 pages in the yellow chapter on chartreuse and it's color combination options!) She ends her book with a chapter on quilt illusions that can be created through "color play" - depth, luminosity, luster, shadows, highlights, and transparency .

This is a good reference book for exciting color combinations. 

Jacobean Flowers


Jacobean Flowers

This is the third of four designs used for the ATHA end of year challenge.  The top piece is a needle punch by Linda.  She usually has a red in her designs so this blue piece was a departure for her.  Judy's piece is on the bottom, and she is hooking her mat in more primitive colors.  I haven't hooked this design yet. 

Sunday, June 16, 2013

Tree Design


Tree Design, 2013
Wool Strips on backing
This tree design was one of four project designs our chapter members chose to hook. Leita's is at the top and was hooked as a name tag with a pin on the back. She did one of the two trees in the design. Mary's tree mat is in the center and is 10" x 10".  She's completing the design as a spring scene. (The clouds are a great addition.) My mat, on the bottom, is 10" x 10" and has a fall palette of colors.  I reversed the original design when I put it on my linen base.