Thursday, April 16, 2015

Colored Pencil


Prismacolor Colored Pencil on Strathmore

Here is an illustration that I'm working on presently in my journal.  The sea water is made of 4 layers of colored pencil, Cerulean Blue, Peacock Blue, Ultramarine, and Copenhagen Blue. Layering colored pencil needs patience as there are not immediate results. I work with a sharp tip and layer the pencils lightly (in a small circular motion) so as not to fill the tooth of the paper right away.  The layers modify the color and give it depth and complexity.


These swatches show layered pencil.  The top blue is Copenhagen Blue, the bottom is the 4 colors from above.  The top red is a single color, the bottom is a combination.  These differences are difficult to see on the computer, but the third sample is easier to see.  The top square is black, the bottom is a combination of many colors - no black at all.  You can see how the bottom color has depth .  The black square is dull and less interesting.  You can make a nice dark, almost black, by mixing colors.  I like to do this in colored pencil pieces and paintings.

Sunday, April 12, 2015

7 Stamps

 Hand-carved Stamps, 2015
Speedy Carve, cutters #1-3 & #5

These are the stamps I had drawn but not carved.  The larger stamp was carved so that the 4 square stamps on the left could be stamped on the top.

Now....... on to a more detailed piece.....

Tuesday, April 7, 2015

Art Journaling Live

Art Journaling Live, 2 DVD Set

Just watched these dvds that recorded 4 live sessions conducted by the artists. I borrowed the set through our local library's inter-library loan program.
Pam demonstrated using faces in journals.  
Dina made multiple layers of color and pattern that she brought together at the conclusion of her lesson by masking and simplifying her page.  

Julie demonstrated color use and pattern with paint.
Traci used printmaking techniques with stamps, paper stencils and masks, and mono-print stamping.

All the women stressed that these journal pages were to be fun and therapeutic, the results were not to be finished pieces for hanging.  The pages were used as ways to experiment and practice with materials that could be used on artwork outside the journal pages, or the journal pages could be an end in themselves. The women have a looseness and freedom in their work that I envy, and I work in a more controlled manner bringing my artwork to a finer level of detail.  Working in a journal in this manner might help me "loosen up".

9 Stamps


 Hand-carved Stamps, 2015
Speedy Carve, cutters #1-3 & #5

Here are 9 more hand-carved stamps, some are from the resources I've previously listed.  The feather is 4 1/4" x 1 3/8" and the single leaf is 1" x 1 3/4". You can estimate the size of the other stamps using these measurements.  All of the stamps I've posted to date (plus 2 more narrow stamps I haven't carved) came from one 6" x 12" sheet of Speedy Carve. I've used even the small pieces (the sunburst with the star in the center). This stamp making is addictive. I have some other small stamps that I've drawn but not yet carved.  Then I need to get serious and try a more detailed carving.


Saturday, April 4, 2015

Stamps

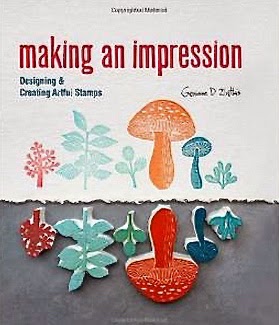
Making an Impression by Geninne D. Zlatkis

This book is another good source for stamp carving instruction.  Geninne includes tools, materials, and techniques plus many projects and ideas.  Her book also has about 50 motifs that readers can use. I carved these two stamps from ideas in her book.  The bird design has been adapted some. 
 Hand-carved Stamps, 2015
Bird 4" x 4", Leaves 1 1/2" x 1 3/4"
Speedy Carve, cutters #1 and #2

Geninne has stamp carving tutorials on her art blog.  She's also posted a stamp carving demo on Vimeo.
She recommends a carving block called Moo Carve. This is 1/2" thick as opposed to Speedy Carve which is 1/4" thick.  The thicker depth should be easier to handle with a larger stamp.  Need to try this, too.

Friday, April 3, 2015

Another Stamp


Hand-carved Stamp, 2015
3" x 3"
Speedy Carve, cutters #1 and #2

Here's a first attempt at a stamp that can be repeated to make a larger design. The flower shape is from one of my sketchbooks. The design at the upper left is my first print. The lower right design shows the final changes to the stamp.  Each design is made by repeating the stamp four times and rotating it by 45 degrees. The completed stamp is in the middle.  I found that if I cut away the extra of the 3" x 3" block, it made for neater print edges.  I may tweek it a little - clean up the edges of the leaves.

Thursday, April 2, 2015

First Hand-carved Stamp

Watching You Tube videos on journaling (example: Julie Fei-Fan Balzer), I found many artists used hand-carved stamps in their work.  I recently read Julie's  Carve, Stamp, Play: Designing and Creating Custom Stamps in which she explains how to design, carve, and combine original stamps.  I also read Gloria Page's Art Stamping Workshop.  Gloria lists materials for creating hand-carved stamps and how to stamp on paper, fabric, and alternative surfaces.

Both books are encouraging and informative.  Many years ago I did some linoleum block carving, but my experience is limited, so the books were helpful.
I already owned a Speedball linoleum cutter (an antique?) with various tips, but I needed a block. I used a Speedy Carve rubber block as Julie recommends in her book. She writes "it skates the perfect line between firmness and softness and doesn't crumble". It carves very easily, is flexible, and feels very much like pink eraser material.
I drew my original design directly on the rubber with a Farber Castell pen - keeping in mind the design will print in reverse. Here you can see the block before it was carved.

After carving the rubber using mostly the #1 tip (small v) in the cutter, I did a test print. Now I can go back to the block and fine tune the design. I'll do as many test prints as necessary until the stamp is complete.
Hand-carved Stamp, 2015
2 1/8" x 3 1/4"
Speedy Carve, #1 cutting blade

The next goals are to create some blocks with designs that I can repeat multiple times to make a larger design........... and to practice cutting!


Wednesday, April 1, 2015

March


March Journal, 2015

This month's journal is made of portraits and zentangles drawn with a Farber Castell ink pen.  You may recognize some faces.