Friday, December 18, 2015

Snowman

Quick Project
#4 and 5 Wool Strips on Linen

This is the little project I'm working on at present.  I needed something quick and fun to work on in the evening to satisfy my want to hook without adding another big project to my list. (I'm procrastinating my gift wrapping!)  This pattern came in an order from Dorr Mill last Christmas (there is no artist name on the pattern) and I had forgotten all about it.  In going through my closet stash the other day, I came across this little snowman and thought it fit the bill. What is hooked in the picture is the entire circular pattern, but I've already started adding an additional border to make the piece a little larger.  The original pattern had a diameter of about 10", but if I add a border I can make yet another pillow.......  

Saturday, December 12, 2015

Again

Primitive Dolls

This book is a great resource for the primitive doll creating process.  Barb Moore's dolls are more primitive looking than those in Prims as you can see in this photo of page 10 in Purely Primitive Dolls:

Barb's book takes you through the entire process: choosing fabrics, how to create a pattern, transferring your own pattern to the fabric, cutting and sewing, stuffing, creating a face, grunging, dressing your doll, and types of accessories for the finished product.  
I'm not sure what drives me to like these.  The fact that I like old items with a history (and these dolls look as though they are vintage).....or that the folk art dolls look so forlorn that you want to give them a home.  They would certainly be conversation starters....  Barb Moore writes: "There is something special about creating your own dolls.  That doll will be your own, and it will hold a piece of your heart." (page 4, Purely Primitive Dolls)

Friday, December 11, 2015

Primitive Dolls


Primitive Dolls

I'm always checking out artists' work on the net and have often been mesmerized by some of the pieces on the Primitive Handmades Mercantile, especially the primitive dolls on My Old Crow Primitives, The Red Cupboard, Bay Ray's Child, and Prairie Prims.  After mentioning my interest to a friend, she lent me some Prims magazines (I'd never seen this periodical before), and these have only fed my desire to give doll making a try.  Prims comes out 3 times a year.  Most of the dolls that are featured are created to look old and well worn with body shapes and limbs that are crude and clothes that are stained.  The bodies are made of muslin using simple patterns, stuffed with old rags, features are added, and then the dolls are"grunged" or painted.  A "grunge" solution might be made of coffee, tea, vanilla, and cinnamon (artists' formulas vary somewhat).  The concoction is heated to thicken it, then brushed on the muslin.  After the doll dries, it might be lightly sanded to give it the worn look.  Clothes are made and stained with tea or coffee.
In the spring/summer 2015 edition there is a pair of worry dolls that are very simple and seem like a good place to start.  Trudy Honeycutt, the artist, provides a pattern and technique suggestions. I'll give it a try and see if I like the process and the results.


Monday, November 23, 2015

Canadian Creative Stitches

Class Project

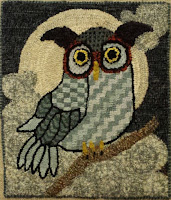
Hooter the Owl, 2015
Wool strips on linen, 12" x 14"

This piece is a project from the class Canadian Creative Stitches taught by Benita Raleigh (highly recommended). The stitches are borrowed from crewel embroidery.  They are hooked by counting stitches and rows (which I was a little lax about after the initial beginning of the pattern).  My patterns were hooked with a #5 cut.  The cut ends are to be left on the back of the piece, but because I want to use this piece as a pillow that will get daily use, I pulled many to the front as I would in traditional hooking.  Some of the stitches are chain stitch, weaving stitch, reverse brick, chess stitch, chevron, cobblestone, and beaded stitch.  Benita states that the stitches are more obvious when you use contrasting colors or at least different values of the same color family.  She recommends that when using these stitches in your work there has to be a balance between using the creative stitches and regular rug hooking stitches.   When I started the piece I was not concerned with what I'd put in the background.  A plainer background may have accentuated the stitching more, but I opted for clouds and the moon.   This was a fun class.

Beach Pattern

ATHA Challenge
It's nice to see that a pattern I drew for the 2013 year end challenge is still being hooked and needle punched by members.

Beach Ladies, 2015
Needle punch embroidery by Linda

Linda's work is always a joy to see.  Her punch needle work is very appealing - the textured surface is like a miniature hooked rug. 


Adapted Beach Ladies, 2015
Rug hooked piece by Ellen

Ellen changed the pattern by making one lady a gentleman - a happy couple.

Thanks for sharing the finished pieces with me.

Thursday, November 5, 2015

Binder


Notebook Cover, 2015

My most valued recipes were in a file folder and slowly getting tattered.  Some were my mother's, some my mother-in-law's, and some just plain delicious.  I decided to put them in plastic sleeves and in a binder.  I found an old blue, cloth covered 3 ring binder at the local recycle center and painted it in greens and red craft paint.  I added some lighter tones through a stencil. The spots are dotted tissue that came with a purchase.  I tore it and attached the pieces with acrylic matte medium by first brushing the cover, placing the tissue on the wet medium, and then painting over the tissue with a brush and medium. I like the way the tissue nearly disappears.

Wednesday, November 4, 2015

Library Project


J. Osterholm, 2015
Acrylic on Strathmore acrylic paper, 5" x 7"


Jane Wilson, 2015
Acrylic on Strathmore acrylic paper, 5' x 7"

These two small paintings were done for our town library.  These two ladies were directors of the library in their time.  The library has photos of all past directors framed and on display.  There were no photos for these two women......therefore, the black and white paintings.  The top painting of Ms. Osterholm was painted from a colored photocopy and Ms. Wilson's portrait was painted from a photo by Steven King that was published in a special section of The Landmark newspaper in May of 1995.  


Sunday, November 1, 2015

A Zentangle


Zentangle, 2015
Micron pen on Canson Multi-media paper, 7" x 10"

There was an interesting blog entry on the Cloth, Paper, Scissors website that defined the 4 types of tangle art. I wasn't even aware that this form of line art had different styles having begun using it after viewing the Zentangle website, blog, and newsletters created by Maria Thomas and Rick Roberts. I'm not exactly sure what style fits this imaginary flower design - is it a Zen-doodle or zentangle inspired art?  

Saturday, October 31, 2015

Day 31

#inktober


Ostrich, 2015
Micron pen on Canson multi-media paper, 6.5" x 7.75"

Last day of Inktober......... made it!

Friday, October 30, 2015

Day 30

#inktober


Huh?, 2015
Micron pen on Canson multi-media paper

Thursday, October 29, 2015

Day 29

#inktober


Hara, 2015
Micron pen on Canson multi-media paper, 5.75" x 8"

Wednesday, October 28, 2015

Day 28

*inktober


The Hat, 2015
Micron pen on Canson multi-media paper, 6" x 7.75"

Tuesday, October 27, 2015

Day 27

#inktober

Autumn, 2015
Prismacolor pen on altered magazine paper, 7" x 9.5"

Day 26

#inktober


Make Today, 2015
Prismacolor pen and Dylusion ink on altered magazine paper,
7" x 4.75"

Day 25

#inktober


Portrait of a Woman, 2015
Micron pen on Canson multi-media paper, 5.25" x 8"

Day 24

#inktober

Jack-in-the-box, 2015
Micron pen on Canson multi-media paper, 5" x 6.75"

Day 23

#inktober

Zentangle, 2015
Prismacolor pen on Canson multi-media paper with Wink of Stella, 5" x 6.5"

The Wink of Stella brush tipped pen covered the zentangle with glitter that doesn't show in this scan. It has a nylon brush and the water-based pigment is archival quality. Fun. I bought the pen at C.C. Lowell in Worcester. 

Sunday, October 25, 2015

Day 22

#inktober

Heron, 2015
Micron pen on altered magazine paper with colored pencil, 6.5" x 9.5"

Saturday, October 24, 2015

Day 21

#inktober


Female Crossbill, 2015
Prismacolor pen and altered magazine paper on Canson paper,
5" x 8"

Day 20

#inktober

Redpoll, 2015
Prismacolor pen on Canson multi-media paper with a light watercolor wash, 5.5" x 6" 

Still trying to catch up with the postings.  I'm realizing that I need more ink colors and need to try some new ink techniques.

Thursday, October 22, 2015

Day 19

#inktober

Zentangle Sun Portrait, 2015
Prismacolor pen on Canson multi-media paper, 7" x 9.25"

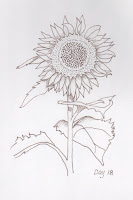
Day 18

#inktober

Sunflower, 2015
Prismacolor pen on Canson multi-media paper, 5" x 8"

Day 17

#inktober


Portrait, 2015
Prismacolor pen on Canson multi-media paper, 6" x 8" 

Day 16

#inktober


Landscape, 2015
Prismacolor pen on altered magazine paper collage, 6.5" x 10"

Need to catch up on postings.  We were away for 5 days without a scanner and Internet connection.

Thursday, October 15, 2015

Day 15

#inktober


Autumn, 2015
Prismacolor pen on altered magazine paper, 6.5" x 10"

Wednesday, October 14, 2015

Day 14

#inktober


Marsh Wren, 2015
Prismacolor pen on Canson multi-media paper, 6" x 9"

Tuesday, October 13, 2015

Day 13

#inktober


Sea Turtle, 2015
Prismacolor pen on altered magazine paper, 7" x 10"

Monday, October 12, 2015

Day 12

#inktober


Cardinal, 2015
Prismacolor pen on altered magazine paper, 6.5" x 10"

Sunday, October 11, 2015

Day 11

#inktober
Everybody's Got a Dog, 2015
Micron pen on altered magazine paper, 10" x 6.5"

The background paper is a page from a National Geographic magazine that was altered with Citrasolv.  The Citrasolv cleaner dissolves the ink on the page and allows me to manipulate the color.  While the ink was still wet, I removed some using a stencil from Clear Scraps.

Saturday, October 10, 2015

Day 10

#inktober

Lion, 2015
Prismacolor pen on Canson multi-media paper, 6" x 6.5"

Friday, October 9, 2015

Day 9


Lady Slippers, 2015
Micron pen on Canson paper, 6" x 8.5"

Thursday, October 8, 2015

Day 8

#inktober


Tree Frog, 2015
Micron pen on Canson Multi-media paper, 5" x 7"

Wednesday, October 7, 2015

Day 7

#inktober
Eastern Box Turtle, 2015
Prismacolor pen on Canson multi-media paper, 6.5" x 5"

Tuesday, October 6, 2015

Day 6

#inktober


Winter, 2015
Prismacolor pen and pencil on Canson multi-media paper, 6.25" x 6"

Monday, October 5, 2015

Pillow

 Plaid Sample Pillow


Front

Our rug hooking teacher asked us to hook a 2.5" x 2.5" square sample of a different plaid each week. This exercise helped us to see what each plaid would look like when hooked.  My choice was to hook each plaid in a square starting at the outside and moving to the middle. The plaid square would not look the same if I'd hooked in lines or hooked randomly (this might be a good idea for a couple samples - just for me to see the potential).  We also worked in a little practice in hooking stars and flowers.  I didn't want the mat to just sit in a draw, so I made a pillow. The strips on the outside were hooked using the proddy tool (July 18th entry).  The tool proved easy to use and made pulling the inch wide strips through the linen very easy on my hands.


Day 5

#inktober

Trees, 2015
Farber-Castell pen on Canson multi-media paper, 5.75" x 5.75"

Sunday, October 4, 2015

Day 4

#inktober

Muir, 2015
Micron on Canson mutimedia paper, 4" x 6"


Cartoon Teddy by Rachel Nedic, 2015
Ink on watercolor paper, 4" x 6"

Saturday, October 3, 2015

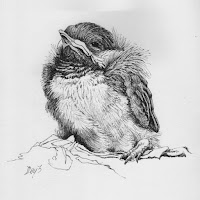
Day 3

#inktober


Young Chickadee, 2015
Micron pen on Cranson multimedia paper, 6.75" x 7"

Pig Cartoon by Rachel Nedic, 2015
Pen on watercolor paper, 3.5" x 5.5"

Rachel is our daughter.  Just thought the pig was cute. 

Friday, October 2, 2015

Day 2

#inktober


Inktober, 2015
Pen and pencil on Canson mixed media paper, 7" x 7"

Thursday, October 1, 2015

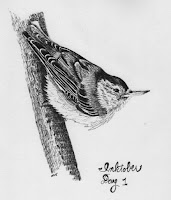
Day 1

#inktober


Nuthatch, 2015
Micron pen on Canson mixed media paper, 6" x 8"

Here's my first ink drawing for the 2015 Challenge.  Let's hope I can keep it up. This will be a good exercise for me as I've been struggling with regular practice.  I have fallen out of the habit of drawing each day and I can feel the difference in my work.  It's said that committing publicly to developing a new habit gives you motivation. Here we go.....

Inktober

*

Inktober 2015
Illustrator Jake Parker created the Inktober Challenge in 2009 as a means to improve skills and to develop good drawing habits. The Challenge - do one ink drawing every day for the month of October.  Some artists may do every other day, some weekly.  Inktober has grown to include artists all over the world.

There are some rules:
1. Do an ink drawing every day.  You can make a pencil sketch first.
2. Post the drawing.
3. Hashtag it with #inktober.


*Karen Arnold

Tuesday, August 18, 2015

Atha Challenge

"Chicken Challenge", June 2015

This is Linda's interpretation of the Atha challenge pattern done in Russian punchneedle.  Beautiful work.

Saturday, July 18, 2015

Proddy Tool


I've been working on two pillows with prodded trim.  The article by Nola A. Heidbreder in the January/February 2015 issue of Rug Hooking magazine inspired my projects.  

Photo from Rug Hooking Magazine .

As described in Nola's directions, the final edge of proddy is completed from the front of the pillow after it has been stuffed and sewn closed.  I didn't have the tool to perform that technique - so - I ordered the tool from Dorr Mill Store.  (I ordered the spring prodder and some wool on the 16th and the order was on my doorstep today, the 18th. That's great customer service!)
Photo from the Dorr Mill Store.

The Rugs and Pugs blog has some simple directions and accompanying photos to explain how to use the proddy tool.  Now I just need to do it.  I'll post photos of the pieces when they're complete.

Saturday, May 23, 2015

Rug Color Choice

Rug Hooking Daily is a website created by Heidi Wulfraat as a place for "learning and sharing" for fiber artists. She posed a question on May 22 asking rug hookers to share ideas that give "inspiration and guidance in the design process".  To start off the discussion she posted this idea and I love it:

"The lovely Laura Kemshall taught me this tool to select a colour palette.  It's a wonderful process that can divert you from habitual colour choices.
1. Select a photograph that particularly speaks to you in terms of colour.
2. Print the photo and cut it into one inch squares.
3. Group the squares in colour families with as much specificity as you can.
4. Define, within reason, the percentage of each colour.
5. Use these colours in their percentages, as the palette for your next rug." Heidi Wulfraat

Now to find THE photo.

Monday, May 18, 2015

ATHA Challenge


"Chicken Challenge", 2015
Wool strips on linen, 18" x 15"

This year's challenge piece is finished - using the pattern I drew for our ATHA chapter. (Challenge posted on February 6th, label: rug hooking)  I didn't change the size of the pattern, but added the chicks and the lettering.  The chicks are done in the Waldoboro Style (sculpted).  They were hooked with high loops.  The loops are then cut and sculpted with scissors to create an area that is rounded and higher than the rug surface.  The sky background is a green, blue, gold, and orange plaid and the rest of the wool is a mixture of strips from my stash. I love the chick on the right - it has "attitude".